Hi,
can anyone help me, i have downloaded airport charts for depature and arrivals, but i need to learn how to use them, i ahve not got a clue, know how to fly gps, ils and visual approches, but i want to take it up a notch or to in my realisim, espically when the controller tells me to depart as per departure procedures,
can anyone help me with this
thanks
Approach and depature plans
17 posts
• Page 1 of 1
![]() by Bandit » Tue Apr 03, 2007 3:11 pm
by Bandit » Tue Apr 03, 2007 3:11 pm
Hovercontrol has an article on this stuff that may help. I'm trying to learn it myself so can fully sympathise with you.
Take a look here for the article.
Take a look here for the article.
Testers are born to fiddle. What does this button do? Oh! Never mind.....
-
Bandit - Forum Addict
- Joined: Fri Jul 21, 2006 10:08 pm
- Posts: 423
- Location: Palmerston North
![]() by Jimmy » Tue Apr 03, 2007 4:47 pm
by Jimmy » Tue Apr 03, 2007 4:47 pm
What sort of charts are they jastheace? Are they called SID (standard instrument departure) and STAR (standard terminal arival route)? Im imagine so seeing you say arival and departure.
They can be a bit hard to understand at first, but picture it this way; the reason SIDs and STARs were created was so ATC don't have to give aircraft instructions over and over again. Such as saying "callsign, headdirect XYZ vor, descened 3000," then "head XY ndb, 1500" etc.. They can just say "Cleared XXX arival for ILS approach 02".
When you look at a approach or departure chart you should be able to define some basic lines, going over certain points such as a VOR. post a link too where you got the chart and ill try and explain it for you, if that helps
James
- Jimmy
![]() by jastheace » Wed Apr 04, 2007 7:34 pm
by jastheace » Wed Apr 04, 2007 7:34 pm
thanks for the help guys, i think i have got it now, will do some approches and depatures tommorow and try out my new knowledge!!
thanks again

thanks again
In the ongoing battle between objects made of aluminum going hundreds of miles per hour and the ground going zero miles per hour, the ground has yet to lose.

-

jastheace - Senior Member
- Topic author
- Joined: Sun Aug 13, 2006 1:33 pm
- Posts: 1032
- Location: Hastings
![]() by jastheace » Wed Apr 04, 2007 10:37 pm
by jastheace » Wed Apr 04, 2007 10:37 pm
i lost touch with vatsim after some very bad experiences whilist i was learning the online flying procedures, i now do not fly online at all, so no i haven't asked there. might give it a try, but i seem to be getting all the help i need here. thanks for the pointer though
In the ongoing battle between objects made of aluminum going hundreds of miles per hour and the ground going zero miles per hour, the ground has yet to lose.
-
jastheace - Senior Member
- Topic author
- Joined: Sun Aug 13, 2006 1:33 pm
- Posts: 1032
- Location: Hastings
![]() by nzav8tor » Thu Apr 05, 2007 3:50 am
by nzav8tor » Thu Apr 05, 2007 3:50 am
I don't want to re-invent the wheel but I'll offer a few pointers on IFR procedures using SID's and STAR's with a small tutorial below based on a Wellington SID.
Firstly, Standard Instrument Departures and Standard Instrument Arrivals are designed to
1) Ensure terrain clearance (to stop you hitting something)
2) To expedite traffic flow (to avoid delays and stop you hitting someone)
3) to Minimise workload for pilots and controllers.
They are based on prescribed tracks TO and FROM a navigation aid such as a VOR or NDB and sometimes a TACAN at military airports.
(This does not include RNAV proc's.)
The chart itself is called a 'Plate' and has lots of useful information, most of it very important for you to be familiar with.
SID's can be displayed in pictorial or word format or sometimes just word.
(Alot of SID's in NZ are written only.)
You need to be familiar with common phraseology used as they are not in plain language but generally pretty self explanatory. Hit me if you need help with definitions.
So, my small tutorial is based on the:
Wellington Standard Instrument Departure DULEX TWO (DULEX2) Runway 16
(Just a nice simple one to get started using only one navaid.)
The DULEX2 is an abbreviation that will be on flightplans and in the FMS, FMC or FMGC and maybe GPS.
Heres the plate, note it is a Jeppesen plate which is a little different from the NZ AIP plate but the info is the same. Sorry if this causes confusion.
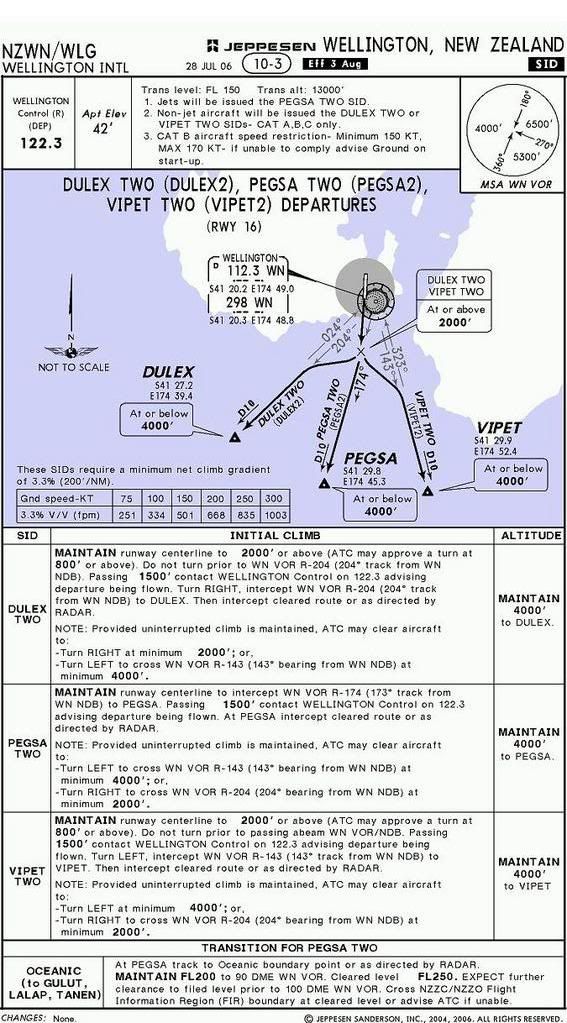
Ok, read the plate from left to right starting at the top, no brainer.
Confirm it is the correct airport. NZWN Wellington, New Zealand.
Under the title is the Effective Date of the plate, not so relevant to Flightsim but critical in real world flying. It says 28 July 2006 as the issue date and in a black box EFF 3 AUG meaning effective from 3 August 2006.
This is the most current version.
'SID' on the right, just to be sure its a departure procedure plate and not an arrival, sometimes they look similar.
Next line we have the departure frequency, this is pretuned in standby on COM1 for quick selection after takeoff.
Airport elevation is next, this is important for the altimetre check to make sure the QNH setting is correct and also for setting pressurisation.
Next is the Transition Level, this is the Flight Level at which you would change to QNH when descending. So passing FL150 you would change to QNH and now be descending to an Altitude.
Transition Altitude is the opposite, climbing through 13000' you would change to Standard 1013 on the altimetre subscale and use flight levels.
There is now a few points to check.
1 and 2 are linked, we are doing the DULEX TWO so we are flying a non-jet aircraft. Cat B for this example.
Point 3 applies to us as Cat B so we have to make sure we maintain not less than 150 knots indicated airspeed and not more than 170 KIAS.
If not we can let ground know at start and the departure may be changed or at least ATC can structure their controlling of our departure better to fit with other traffic. We are flying a B1900D today, normal climb at 160 KIAS so no problem.
And next is the MSA diagram. This is very important. It shows the Minimum Safe Altitude with a 25 nautical mile radius of the Wellington VOR.
On the west of the 360/180 radials MSA is 4000' Above Mean Sea Level, northeast between 360 and 270 radials it is 6500 and to the south east it is 5300'.
Our departure is climbing to the south west so applicable MSA is 4000'. This is the minimum altitude we should be at in IMC conditions in this sector to ensure terrain clearance.
Ok now for the departure itself.
We can see that there are two navaids available to us WN VOR 112.30 which has a DME indicated by the small D in the top left corner of the indentifier box and the WN NDB 298.
There is also a small morse identifier code which we will use to verify we have the right aid tuned.
The picture shows a dark black line, this is the actual track required for the SID. Be careful as this plate has three different departure procedures on it, ours is the DULEX2 which is written clearly beneath the track we should be taking.
(Confusion here can be disasterous!)
A quick glance shows the track is straight ahead for a bit to a X and then a turn to the right to the point DULEX with the comment At or below 4000'. DULEX is an imaginary point located on Radial 204 FROM WN VOR at 10 NM DME.
We will now check the wording and come back to the diagram shortly.
As it is written we must MAINTAIN runway centreline to 2000' or above.
This is on QNH. The info in brackets is not mandatory, its just to let you know that you may get a turn clearance below 2000'.
The important thing though, is that you cannot turn until you have passed the 204 radial FROM WN. If you turn before, you are now on the western side of the track and will have to turn left to re intercept, not cool. The procedure is designed so that as long as you are on the prescribed tracks you are protected from terrain or other features so if you deviate from the SID then you are at risk of collision with something. Especially if you are IMC, one engine out and now in unprotected airspace, a very bad situation indeed.
Ok, now passing 1500' we can change to the departure freq and contact them. This reduces workload for the tower and the pilot as he/she doesn't have to hand you off taking up time and you dont have to respond.
Then turn RIGHT (very important) and intercept the 204 radial FROM WN VOR.
You will probably be only a few miles from the VOR so you dont need a big turn to intercept, depending on the wind, heading 230 will probably be fine. Increase if the radial isnt moving or begin the left turn to intercept quickly if the needle moves fast.
Intercept the radial and follow for 10 DME. You are now at DULEX.
To the right is the altitude information, its no coincidence that this is 4000' the same as the MSA.
It is very important to climb to 4000' and maintain it. The sooner you get there the better, you dont have to reach DULEX at the same time as you reach 4000'
Climb to 4000' and stay there until ATC tells you otherwise.
If you are not able to reach 4000' by DULEX ATC may give you further instructions until you reach the MSA and can turn onto track. This may be further climb in the 204 radial or something similar.
The instructions below the written SID relate to your navigation after the SID.
If you are turning right on track then you may get this clearance as low as 2000'. If you are turning left on track then you have to pass the 143 radial FROM WN at minimum 4000'.
Back to the diagram above and there is one very important box in the bottom left.
This is the climb gradient information in order to ensure terrain avoidance.
The statement reads "These SIDS require a minimum net climb gradient of 3.3% (200' /NM)"
The pilot must ensure, by referring to the aircraft flight manual that the minimum net climb gradient with one engine out at the planned takeoff weight and temperature will meet this requirement. If not, the departure can not be flown.
To make this figure a bit more user friendly jeppesen have kindly included a box below showing the climb rate in feet per minute for a given ground speed to meet this climb gradient.
We are doing 160 KIAS so we need a little more than 500 fpm to meet this climb gradient. No problem with two engines and will be fine with one today.
The rest of the info on the plate applies to the other departures so we're done with the briefing.
To fly the SID in the aircraft is much more simple now we have had a good look over the plate and know the critical information.
First we can preselect 4000 altitude for the autopilot and our own reference if handflying.
Now set the heading bug to 160, runway heading.
Now tune up WN VOR 112.30 in NAV1 and NAV2. (As a back up.)
Do the TIT check, tune, identify, test.
Tune the frequency.
Identify it by turning on the ident channel for NAV1 and listening for the morse identifier. Dot Dash Dash pause Dash Dot.
Test the VOR is working correctly by rotating the OBS selector knob until the needle moves from full left to right deflection and there are no warning or off flags on the HSI, RMI or NAV instruments.
Tune the NDB freq 298 and indent it just in case the VOR fails during the departure. Some redundency here.
Now preselect 204 on the HSI with OBS knob. The needle should be fully deflected to the left and there should be a FROM flag indicating.
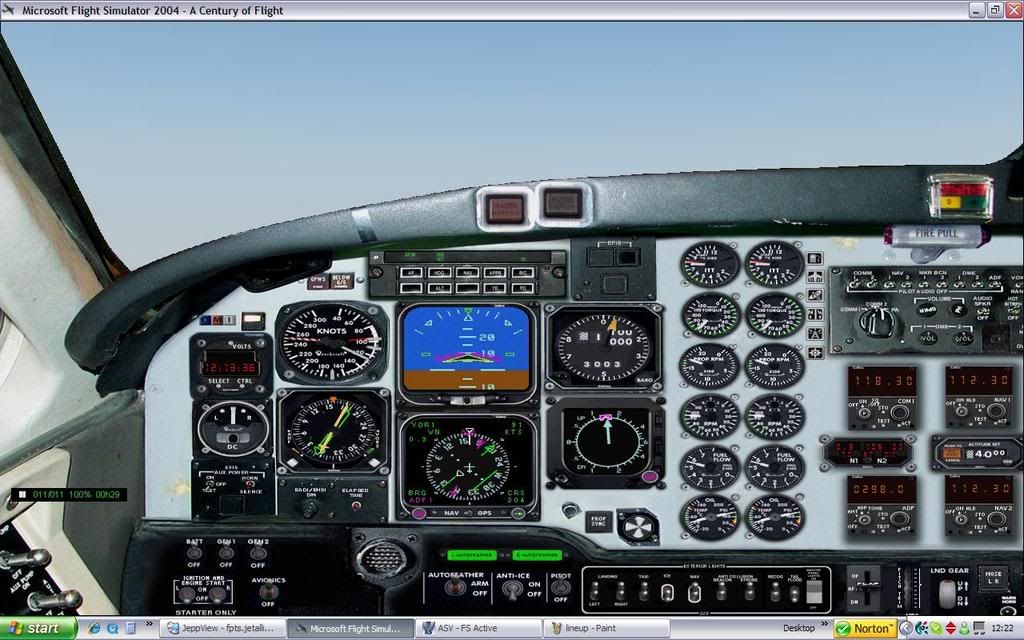
Heres the setup before taxi. (I dont use ATC in flightsim so disregard the com settings.)
Ok, lined up.
Rolling and airborne, ensure you are meeting the climb gradient.
If you loose an engine now you must climb at V2 or else you might not be meeting the gradient. (The book figure is based on a climb at V2.)
Within a few seconds the FROM flag should change to TO and then slightly later the needle on the HSI should swing over to be deflected fully to the right.
Ensure you are correcting for wind and maintaining the runway centreline.
Passing 1500' switch over to departure and advise the SID you are flying, DULEX TWO.
Passing 2000' turn right to around 230 and continue climbing to 4000'.
Shortly you will see the HSI needle 'come alive' and begin moving toward the left, catch it and centre it by turning left. You can use NAV mode on the autopilot or just for the flight director if handflying but make sure your nav source is NAV not GPS. (Should have been checked during taxi.)
Keep the needle centered and keep climbing to and then maintiain 4000'.
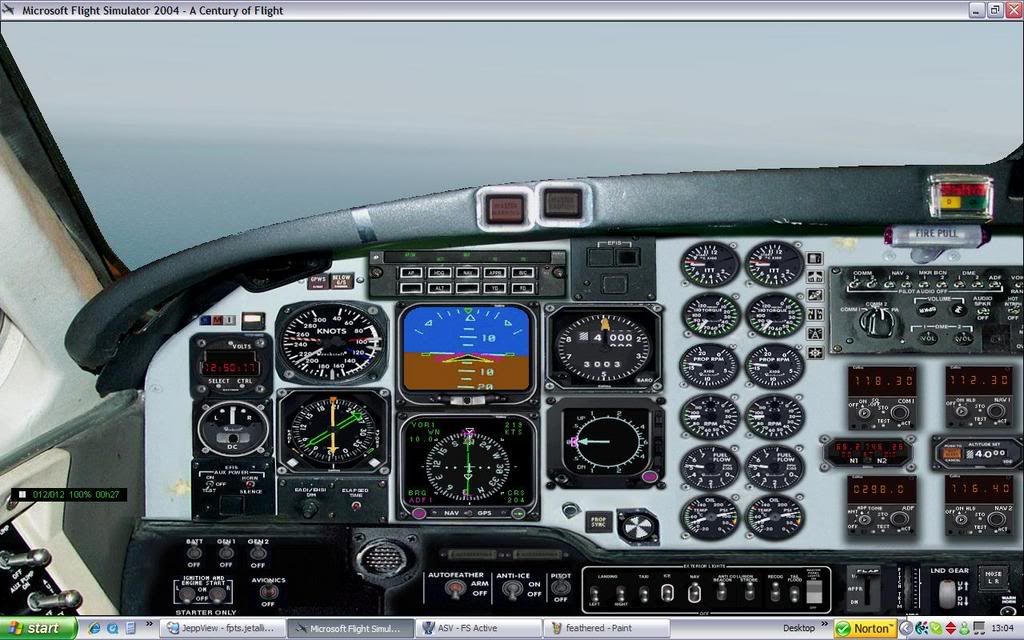
At 10 DME WN you are at DULEX and the SID is complete. ATC will issue further instructions at or before DULEX.
At DULEX
Thats it.
***As an afterthought I thought it was worth mentioning the reason the SID has been designed like this is to get slower traffic out of the way of the faster jets.
Going back to point 2 of purpose of a SID at the top, "To Expedite Traffic Flow.***
Use this same principle for flying any SID or STAR taking note of the information displayed on the plate. Its all there for a reason.
If you have any questions relating to this or any other procedures fire away.
Regards,
Dave
Firstly, Standard Instrument Departures and Standard Instrument Arrivals are designed to
1) Ensure terrain clearance (to stop you hitting something)
2) To expedite traffic flow (to avoid delays and stop you hitting someone)
3) to Minimise workload for pilots and controllers.
They are based on prescribed tracks TO and FROM a navigation aid such as a VOR or NDB and sometimes a TACAN at military airports.
(This does not include RNAV proc's.)
The chart itself is called a 'Plate' and has lots of useful information, most of it very important for you to be familiar with.
SID's can be displayed in pictorial or word format or sometimes just word.
(Alot of SID's in NZ are written only.)
You need to be familiar with common phraseology used as they are not in plain language but generally pretty self explanatory. Hit me if you need help with definitions.
So, my small tutorial is based on the:
Wellington Standard Instrument Departure DULEX TWO (DULEX2) Runway 16
(Just a nice simple one to get started using only one navaid.)
The DULEX2 is an abbreviation that will be on flightplans and in the FMS, FMC or FMGC and maybe GPS.
Heres the plate, note it is a Jeppesen plate which is a little different from the NZ AIP plate but the info is the same. Sorry if this causes confusion.
Ok, read the plate from left to right starting at the top, no brainer.
Confirm it is the correct airport. NZWN Wellington, New Zealand.
Under the title is the Effective Date of the plate, not so relevant to Flightsim but critical in real world flying. It says 28 July 2006 as the issue date and in a black box EFF 3 AUG meaning effective from 3 August 2006.
This is the most current version.
'SID' on the right, just to be sure its a departure procedure plate and not an arrival, sometimes they look similar.
Next line we have the departure frequency, this is pretuned in standby on COM1 for quick selection after takeoff.
Airport elevation is next, this is important for the altimetre check to make sure the QNH setting is correct and also for setting pressurisation.
Next is the Transition Level, this is the Flight Level at which you would change to QNH when descending. So passing FL150 you would change to QNH and now be descending to an Altitude.
Transition Altitude is the opposite, climbing through 13000' you would change to Standard 1013 on the altimetre subscale and use flight levels.
There is now a few points to check.
1 and 2 are linked, we are doing the DULEX TWO so we are flying a non-jet aircraft. Cat B for this example.
Point 3 applies to us as Cat B so we have to make sure we maintain not less than 150 knots indicated airspeed and not more than 170 KIAS.
If not we can let ground know at start and the departure may be changed or at least ATC can structure their controlling of our departure better to fit with other traffic. We are flying a B1900D today, normal climb at 160 KIAS so no problem.
And next is the MSA diagram. This is very important. It shows the Minimum Safe Altitude with a 25 nautical mile radius of the Wellington VOR.
On the west of the 360/180 radials MSA is 4000' Above Mean Sea Level, northeast between 360 and 270 radials it is 6500 and to the south east it is 5300'.
Our departure is climbing to the south west so applicable MSA is 4000'. This is the minimum altitude we should be at in IMC conditions in this sector to ensure terrain clearance.
Ok now for the departure itself.
We can see that there are two navaids available to us WN VOR 112.30 which has a DME indicated by the small D in the top left corner of the indentifier box and the WN NDB 298.
There is also a small morse identifier code which we will use to verify we have the right aid tuned.
The picture shows a dark black line, this is the actual track required for the SID. Be careful as this plate has three different departure procedures on it, ours is the DULEX2 which is written clearly beneath the track we should be taking.
(Confusion here can be disasterous!)
A quick glance shows the track is straight ahead for a bit to a X and then a turn to the right to the point DULEX with the comment At or below 4000'. DULEX is an imaginary point located on Radial 204 FROM WN VOR at 10 NM DME.
We will now check the wording and come back to the diagram shortly.
As it is written we must MAINTAIN runway centreline to 2000' or above.
This is on QNH. The info in brackets is not mandatory, its just to let you know that you may get a turn clearance below 2000'.
The important thing though, is that you cannot turn until you have passed the 204 radial FROM WN. If you turn before, you are now on the western side of the track and will have to turn left to re intercept, not cool. The procedure is designed so that as long as you are on the prescribed tracks you are protected from terrain or other features so if you deviate from the SID then you are at risk of collision with something. Especially if you are IMC, one engine out and now in unprotected airspace, a very bad situation indeed.
Ok, now passing 1500' we can change to the departure freq and contact them. This reduces workload for the tower and the pilot as he/she doesn't have to hand you off taking up time and you dont have to respond.
Then turn RIGHT (very important) and intercept the 204 radial FROM WN VOR.
You will probably be only a few miles from the VOR so you dont need a big turn to intercept, depending on the wind, heading 230 will probably be fine. Increase if the radial isnt moving or begin the left turn to intercept quickly if the needle moves fast.
Intercept the radial and follow for 10 DME. You are now at DULEX.
To the right is the altitude information, its no coincidence that this is 4000' the same as the MSA.
It is very important to climb to 4000' and maintain it. The sooner you get there the better, you dont have to reach DULEX at the same time as you reach 4000'
Climb to 4000' and stay there until ATC tells you otherwise.
If you are not able to reach 4000' by DULEX ATC may give you further instructions until you reach the MSA and can turn onto track. This may be further climb in the 204 radial or something similar.
The instructions below the written SID relate to your navigation after the SID.
If you are turning right on track then you may get this clearance as low as 2000'. If you are turning left on track then you have to pass the 143 radial FROM WN at minimum 4000'.
Back to the diagram above and there is one very important box in the bottom left.
This is the climb gradient information in order to ensure terrain avoidance.
The statement reads "These SIDS require a minimum net climb gradient of 3.3% (200' /NM)"
The pilot must ensure, by referring to the aircraft flight manual that the minimum net climb gradient with one engine out at the planned takeoff weight and temperature will meet this requirement. If not, the departure can not be flown.
To make this figure a bit more user friendly jeppesen have kindly included a box below showing the climb rate in feet per minute for a given ground speed to meet this climb gradient.
We are doing 160 KIAS so we need a little more than 500 fpm to meet this climb gradient. No problem with two engines and will be fine with one today.
The rest of the info on the plate applies to the other departures so we're done with the briefing.
To fly the SID in the aircraft is much more simple now we have had a good look over the plate and know the critical information.
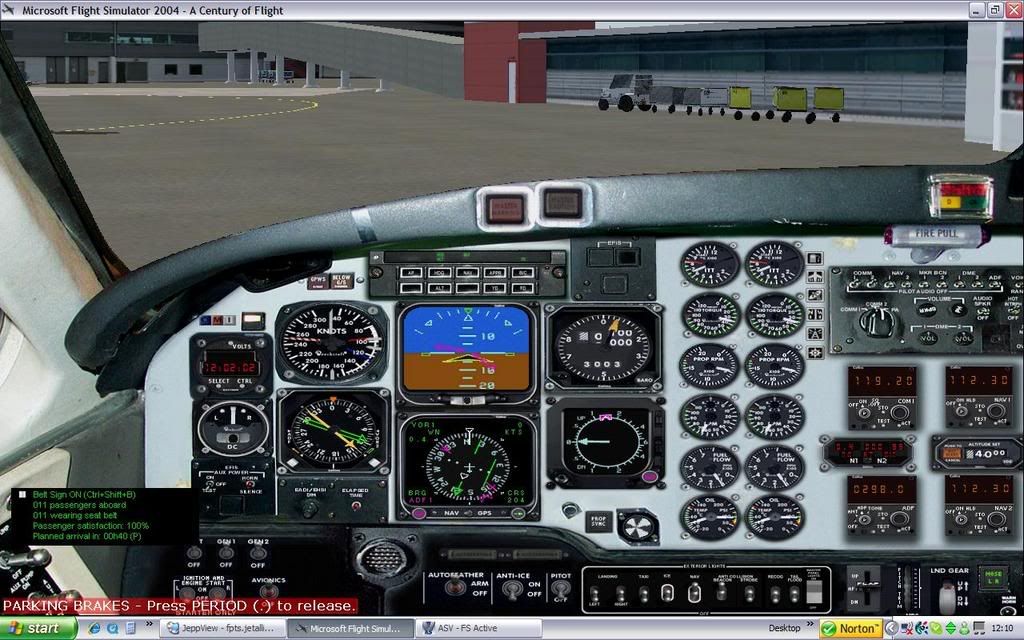
First we can preselect 4000 altitude for the autopilot and our own reference if handflying.
Now set the heading bug to 160, runway heading.
Now tune up WN VOR 112.30 in NAV1 and NAV2. (As a back up.)
Do the TIT check, tune, identify, test.
Tune the frequency.
Identify it by turning on the ident channel for NAV1 and listening for the morse identifier. Dot Dash Dash pause Dash Dot.
Test the VOR is working correctly by rotating the OBS selector knob until the needle moves from full left to right deflection and there are no warning or off flags on the HSI, RMI or NAV instruments.
Tune the NDB freq 298 and indent it just in case the VOR fails during the departure. Some redundency here.
Now preselect 204 on the HSI with OBS knob. The needle should be fully deflected to the left and there should be a FROM flag indicating.
Heres the setup before taxi. (I dont use ATC in flightsim so disregard the com settings.)
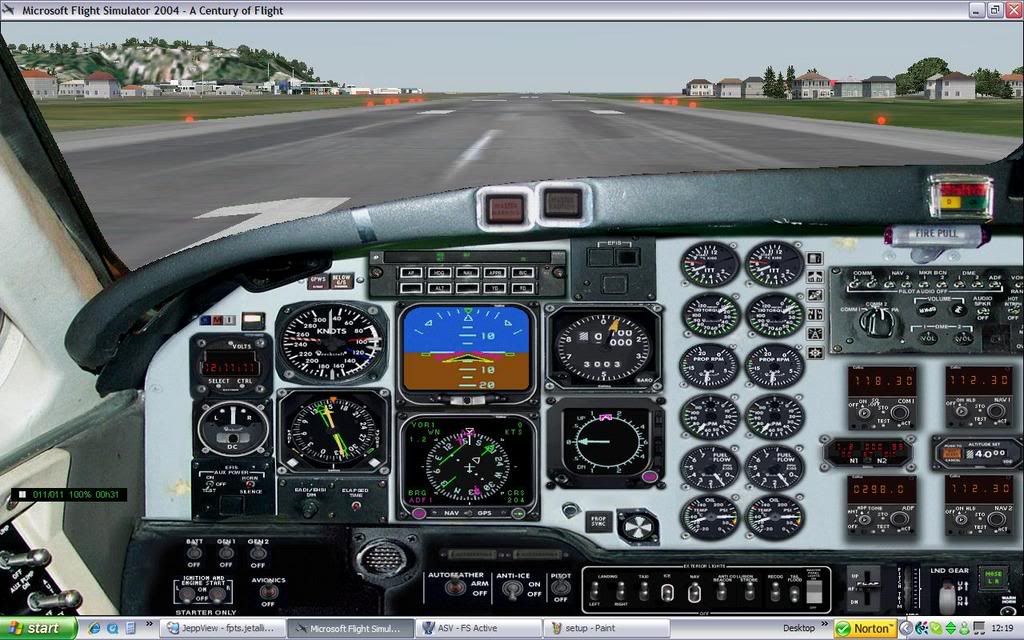
Ok, lined up.
Rolling and airborne, ensure you are meeting the climb gradient.
If you loose an engine now you must climb at V2 or else you might not be meeting the gradient. (The book figure is based on a climb at V2.)
Within a few seconds the FROM flag should change to TO and then slightly later the needle on the HSI should swing over to be deflected fully to the right.
Ensure you are correcting for wind and maintaining the runway centreline.
Passing 1500' switch over to departure and advise the SID you are flying, DULEX TWO.
Passing 2000' turn right to around 230 and continue climbing to 4000'.
Shortly you will see the HSI needle 'come alive' and begin moving toward the left, catch it and centre it by turning left. You can use NAV mode on the autopilot or just for the flight director if handflying but make sure your nav source is NAV not GPS. (Should have been checked during taxi.)
Keep the needle centered and keep climbing to and then maintiain 4000'.
At 10 DME WN you are at DULEX and the SID is complete. ATC will issue further instructions at or before DULEX.
At DULEX
Thats it.
***As an afterthought I thought it was worth mentioning the reason the SID has been designed like this is to get slower traffic out of the way of the faster jets.
Going back to point 2 of purpose of a SID at the top, "To Expedite Traffic Flow.***
Use this same principle for flying any SID or STAR taking note of the information displayed on the plate. Its all there for a reason.
If you have any questions relating to this or any other procedures fire away.
Regards,
Dave
Last edited by nzav8tor on Fri Apr 06, 2007 12:12 am, edited 1 time in total.
-

nzav8tor - Forum Addict
- Joined: Sat Feb 24, 2007 4:31 am
- Posts: 222
- Location: PN
![]() by Charl » Thu Apr 05, 2007 8:34 am
by Charl » Thu Apr 05, 2007 8:34 am
I'll have to read this again later because it deserves better attention.
In my rebuilt sim I've determined that I'll go back to heavy metal for a bit, see the world.
I think your post may be the answer to a long-lost prayer - we'll pin it somewhere for future reference.
Many thanks Dave.
In my rebuilt sim I've determined that I'll go back to heavy metal for a bit, see the world.
I think your post may be the answer to a long-lost prayer - we'll pin it somewhere for future reference.
Many thanks Dave.
-

Charl - NZFF Pro
- Joined: Mon May 01, 2006 8:28 am
- Posts: 9801
- Location: Auckland
![]() by nzav8tor » Thu Apr 05, 2007 8:52 am
by nzav8tor » Thu Apr 05, 2007 8:52 am
Its one of those things you start then can't stop.
If I explain one thing I have to explain the next and so on.
Next week its flying DME ARC's with wind correction!
Haha, seriously though I am happy to contribute more procedure based stuff if anyone is interested.
How to fly a visual approach in a jet is a good one I think, will make life much easier when you learn a few basics.
It doesn't work to fly a typical circuit like in a little plane...
-
nzav8tor - Forum Addict
- Joined: Sat Feb 24, 2007 4:31 am
- Posts: 222
- Location: PN
![]() by jastheace » Thu Apr 05, 2007 9:02 am
by jastheace » Thu Apr 05, 2007 9:02 am
that is great, i personally would love to learn more, need more, more MORE !!! 
In the ongoing battle between objects made of aluminum going hundreds of miles per hour and the ground going zero miles per hour, the ground has yet to lose.
-
jastheace - Senior Member
- Topic author
- Joined: Sun Aug 13, 2006 1:33 pm
- Posts: 1032
- Location: Hastings
![]() by Ian Warren » Fri Apr 06, 2007 12:30 am
by Ian Warren » Fri Apr 06, 2007 12:30 am
Dave , I needed this info, Thanx , very priv'ledge'd to read save and copy, and follow thru never really thought about it , Brilliant Ian

-

Ian Warren - NZFF Pro
- Joined: Fri May 05, 2006 5:23 pm
- Posts: 41187
- Location: AREA 51
17 posts
• Page 1 of 1
Who is online
Users browsing this forum: No registered users and 36 guests