Cockpit building

The place to ask for help or solve each others technical issues and discuss hardware

Postby jastheace » Wed May 06, 2009 4:49 pm

well an update, i have finished the main structure and it is in use, things will be added as i can afford things (read get around my wife!!)


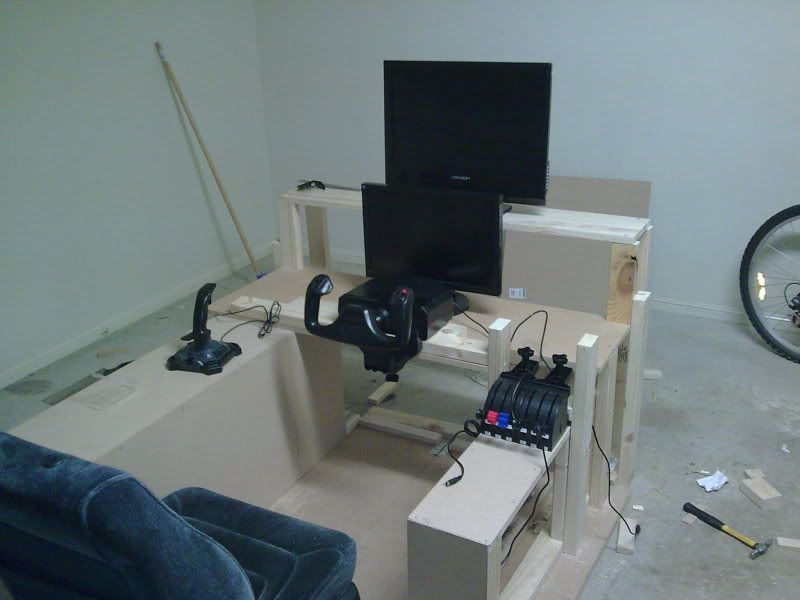
abit of a mock set up to see how it is working
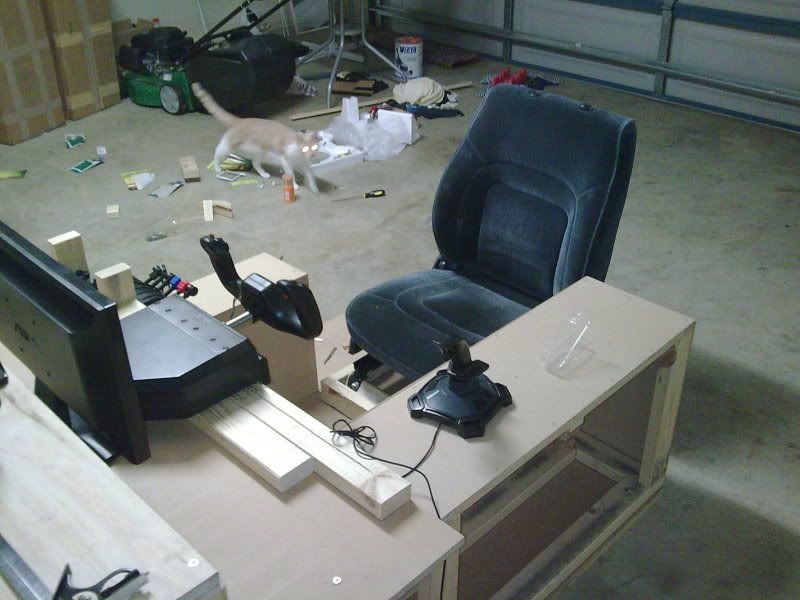


ditto


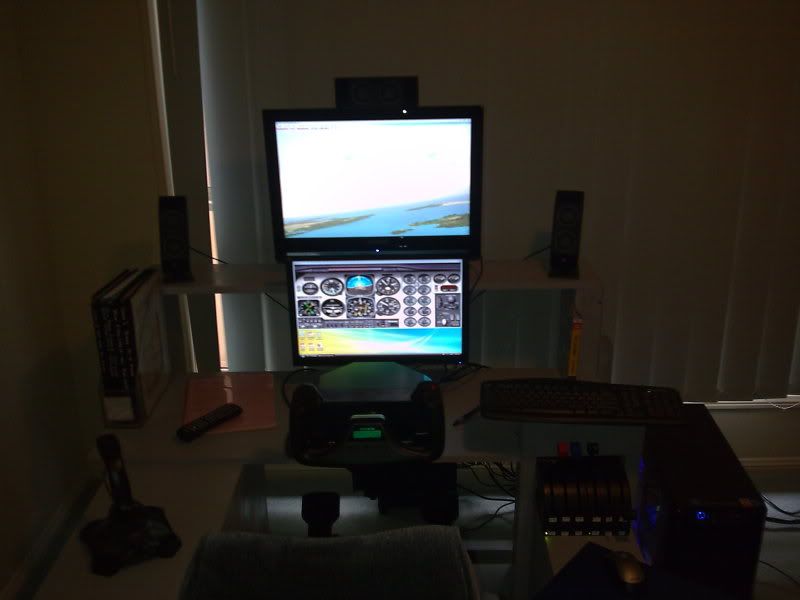
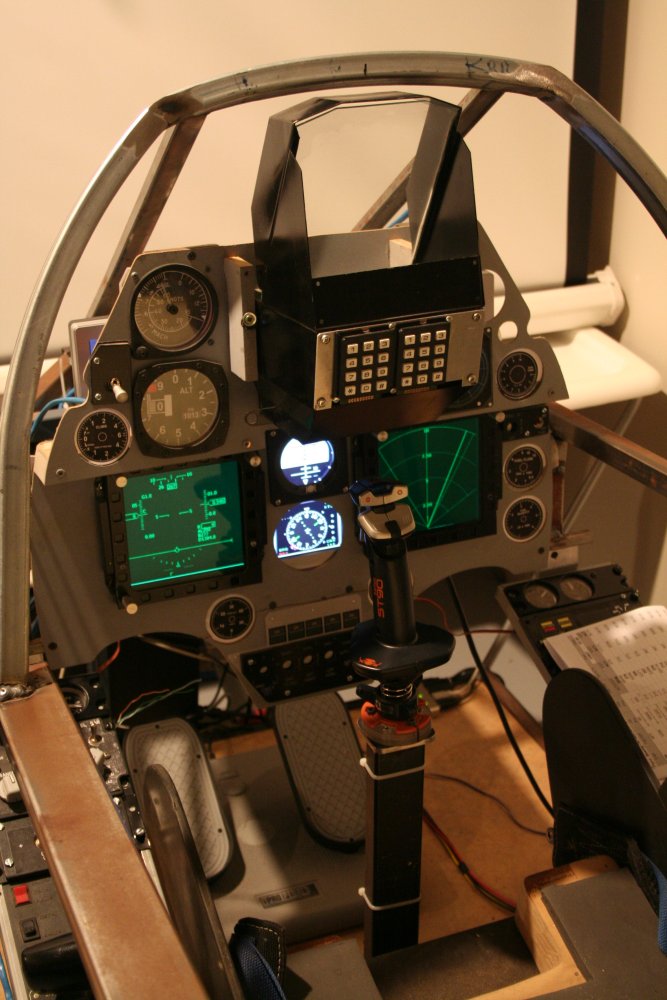
the completed cockpit installed in the computer room opps i mean the cockpit!!


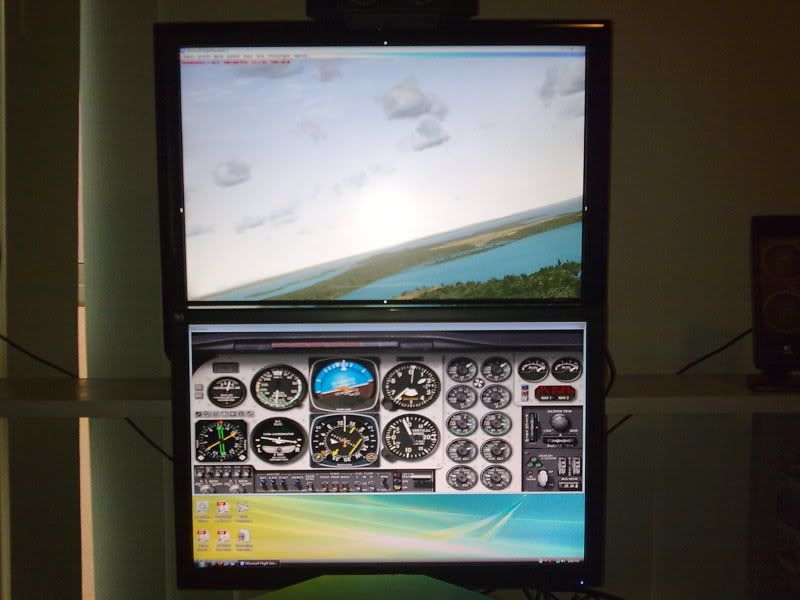
the two screen layout i have set up, works well for the likes of the default baron, but some more advanced aircraft are requiring abit of a rethink as to how to set up the gauges on the bottom screen, some might just have to be set up with the vc in the main screen and the other things like ivap and such in the second
In the ongoing battle between objects made of aluminum going hundreds of miles per hour and the ground going zero miles per hour, the ground has yet to lose.

Image
User avatar
jastheace
Senior Member
 
Joined: Sun Aug 13, 2006 1:33 pm
Posts: 1032
Location: Hastings

Postby Njbb1995 » Wed May 06, 2009 7:23 pm

Saw hi to your Cat for me... Looking Good as well Jason. And Tower guy as well. If I had the time, and money.....
User avatar
Njbb1995
Sim-holic
 
Joined: Fri Nov 23, 2007 5:02 pm
Posts: 860
Location: Blenheim

Postby jastheace » Wed May 06, 2009 7:51 pm

njbb1995 wrote:
QUOTE (njbb1995 @ May 11 2009, 08:23 AM) <{POST_SNAPBACK}>
Saw hi to your Cat for me... Looking Good as well Jason. And Tower guy as well. If I had the time, and money.....


yeah the co pilot was running her eye over it, she approves, a nice new seat to sit on!!! it cost about $200.00 all up with paint, lumber and the seat so not two bad when you think about it
In the ongoing battle between objects made of aluminum going hundreds of miles per hour and the ground going zero miles per hour, the ground has yet to lose.

Image
User avatar
jastheace
Senior Member
 
Joined: Sun Aug 13, 2006 1:33 pm
Posts: 1032
Location: Hastings

Postby LMerraine » Wed May 06, 2009 10:30 pm

Looks great, wish I could build something like that, Don't have the tools though sad.gif Or the skills smile.gif
When asked what I have contributed to on this earth my reply will be my daugther
LMerraine
Forum Addict
 
Joined: Sun Sep 23, 2007 4:19 pm
Posts: 278
Location: Northam, WA

Postby SeanG » Wed May 06, 2009 10:35 pm

jastheace wrote:
QUOTE (jastheace @ May 6 2009, 07:51 PM) <{POST_SNAPBACK}>
yeah the co pilot was running her eye over it, she approves, a nice new seat to sit on!!! it cost about $200.00 all up with paint, lumber and the seat so not two bad when you think about it


That is looking very slick! Now you just need some switch panels so you can do away with your keyboard and you'll be in sim-heaven smile.gif I have a Saitek yoke, and was thinking about doing something like you have done (on a smaller scale...) and it is nice to see what it could, conceivably, look like smile.gif


While I'm at it... I have updated by sim-blog at http://www.simpits.org/seang/
My Sim is up and running now, and starting to get exciting smile.gif


SeanG
Last edited by SeanG on Wed May 06, 2009 10:35 pm, edited 1 time in total.
Please note I have left this forum, due to an unfortunate incident. I can be contacted on the MilitaryAIWorks forum at http://www.militaryaiworks.com/
SeanG
Member
 
Joined: Thu Oct 18, 2007 8:05 pm
Posts: 128
Location: Christchurch

Postby jastheace » Wed May 06, 2009 10:41 pm

SeanG wrote:
QUOTE (SeanG @ May 11 2009, 10:35 AM) <{POST_SNAPBACK}>
That is looking very slick! Now you just need some switch panels so you can do away with your keyboard and you'll be in sim-heaven smile.gif I have a Saitek yoke, and was thinking about doing something like you have done (on a smaller scale...) and it is nice to see what it could, conceivably, look like smile.gif


While I'm at it... I have updated by sim-blog at http://www.simpits.org/seang/
My Sim is up and running now, and starting to get exciting smile.gif

SeanG


that looks good, i am trying to decide on the best way to add the switches, i am thinking aboug getting a couple of old joysticks and pulling the switches out (could use the axis for gear levers etc), or using the card you mentioned earlier, i am hoping to add a radio stack above the throttle in due time, and hope to build in the joystick (so i can remove it when not flying stick ac). but that is a long term plan, the best thing about it is it all breaks down and is easy to move around.

they only tools i used were a cordless drill, a mitre saw tape measure and set square!!!!

Jason
In the ongoing battle between objects made of aluminum going hundreds of miles per hour and the ground going zero miles per hour, the ground has yet to lose.

Image
User avatar
jastheace
Senior Member
 
Joined: Sun Aug 13, 2006 1:33 pm
Posts: 1032
Location: Hastings

Postby LMerraine » Thu May 07, 2009 12:09 am

Plans?? Could probably find a mitre saw to hire I guess smile.gif
When asked what I have contributed to on this earth my reply will be my daugther
LMerraine
Forum Addict
 
Joined: Sun Sep 23, 2007 4:19 pm
Posts: 278
Location: Northam, WA

Postby jastheace » Thu May 07, 2009 12:43 am

LMerraine wrote:
QUOTE (LMerraine @ May 11 2009, 01:09 PM) <{POST_SNAPBACK}>
Plans?? Could probably find a mitre saw to hire I guess smile.gif


planes, nope all in my head blink.gif , rough sketch on paper, then made up as i went along, taking key measurements as stages, worked well for winging it i guess!!!

Towerguy, making some real progress there, if i had our own house i think i would look at something like what you are doing, but as i am renting it must be movable, easily anyways winkyy.gif
In the ongoing battle between objects made of aluminum going hundreds of miles per hour and the ground going zero miles per hour, the ground has yet to lose.

Image
User avatar
jastheace
Senior Member
 
Joined: Sun Aug 13, 2006 1:33 pm
Posts: 1032
Location: Hastings

Postby SeanG » Thu May 07, 2009 3:07 pm

jastheace wrote:
QUOTE (jastheace @ May 6 2009, 10:41 PM) <{POST_SNAPBACK}>
that looks good, i am trying to decide on the best way to add the switches, i am thinking aboug getting a couple of old joysticks and pulling the switches out (could use the axis for gear levers etc), or using the card you mentioned earlier, i am hoping to add a radio stack above the throttle in due time, and hope to build in the joystick (so i can remove it when not flying stick ac). but that is a long term plan, the best thing about it is it all breaks down and is easy to move around.

they only tools i used were a cordless drill, a mitre saw tape measure and set square!!!!

Jason


Mate, you're one up on me.. I got a hand drill!

Anyway, if you want to do switches cheap (I mean really cheap) get a USB Gamepad, I used a "Genius" with no analogues, ripped it to bits and connected switches to it. Programmed the switches with FSUIPC and voila! Cheap interface for 8 to 12 switches ;-) I *will* do a photo-how-to on this at some point, but trust me, it really is *that* easy smile.gif

SeanG
Please note I have left this forum, due to an unfortunate incident. I can be contacted on the MilitaryAIWorks forum at http://www.militaryaiworks.com/
SeanG
Member
 
Joined: Thu Oct 18, 2007 8:05 pm
Posts: 128
Location: Christchurch

Postby jastheace » Thu May 07, 2009 4:23 pm

SeanG wrote:
QUOTE (SeanG @ May 12 2009, 03:07 AM) <{POST_SNAPBACK}>
Mate, you're one up on me.. I got a hand drill!

Anyway, if you want to do switches cheap (I mean really cheap) get a USB Gamepad, I used a "Genius" with no analogues, ripped it to bits and connected switches to it. Programmed the switches with FSUIPC and voila! Cheap interface for 8 to 12 switches ;-) I *will* do a photo-how-to on this at some point, but trust me, it really is *that* easy smile.gif

SeanG


sounds right up my alley, do you need any special momentary contact switches, or will normal toggle on/off switches work??
In the ongoing battle between objects made of aluminum going hundreds of miles per hour and the ground going zero miles per hour, the ground has yet to lose.

Image
User avatar
jastheace
Senior Member
 
Joined: Sun Aug 13, 2006 1:33 pm
Posts: 1032
Location: Hastings

Postby Njbb1995 » Thu May 07, 2009 4:43 pm

How much was your cockpit Sean?, Just out of interest. I think it looks really good BTW
User avatar
Njbb1995
Sim-holic
 
Joined: Fri Nov 23, 2007 5:02 pm
Posts: 860
Location: Blenheim

Postby SeanG » Thu May 07, 2009 10:56 pm

jastheace wrote:
QUOTE (jastheace @ May 7 2009, 04:23 PM) <{POST_SNAPBACK}>
sounds right up my alley, do you need any special momentary contact switches, or will normal toggle on/off switches work??


Normal toggles are fine. I am even running rotary switches on my gamepad, to control radar modes on Eric Marcianos' payware radar gauges smile.gif


njbb1995 wrote:
QUOTE (njbb1995 @ May 7 2009, 04:43 PM) <{POST_SNAPBACK}>
How much was your cockpit Sean?, Just out of interest. I think it looks really good BTW


Cost? That depends on how you quantify it. The biggest cost is time. The raw materials are not that expensive, I mean RHS Steel aint too dear, neither is MDF, but the time to bring it all together, that's a whole different ball game smile.gif

The reality is; I probably don't want to know what the true cost is. But for me the payoff of being able to fly the thing whenever I want is worth whatever the cost smile.gif I can wander out to the sim-cave, climb into the 'pit and go flying whenever I want, and that my friend, you can't put a price on! <lol>

SeanG <yeah ok, so I am proabably certifiable...>
Last edited by SeanG on Thu May 07, 2009 10:57 pm, edited 1 time in total.
Please note I have left this forum, due to an unfortunate incident. I can be contacted on the MilitaryAIWorks forum at http://www.militaryaiworks.com/
SeanG
Member
 
Joined: Thu Oct 18, 2007 8:05 pm
Posts: 128
Location: Christchurch

Postby Ian Warren » Fri May 08, 2009 3:00 am

Scary thing is Sean ... if the Skyhawks cockpits were damaged up at Woodbourne due to water ingestion , and they need replacement parts .. you have guys looking like this ninja.gif at your door wanting to graphed your setup directly on the real thing !
Image
User avatar
Ian Warren
NZFF Pro
 
Joined: Fri May 05, 2006 5:23 pm
Posts: 41187
Location: AREA 51

Postby SeanG » Fri May 08, 2009 3:41 pm

Ian Warren wrote:
QUOTE (Ian Warren @ May 8 2009, 03:00 AM) <{POST_SNAPBACK}>
Scary thing is Sean ... if the Skyhawks cockpits were damaged up at Woodbourne due to water ingestion , and they need replacement parts .. you have guys looking like this ninja.gif at your door wanting to graphed your setup directly on the real thing !


I wouldn't want to be the pilot of *that* skyhawk, not with your life depending on by dodgy welding! <lol>

SeanG
Please note I have left this forum, due to an unfortunate incident. I can be contacted on the MilitaryAIWorks forum at http://www.militaryaiworks.com/
SeanG
Member
 
Joined: Thu Oct 18, 2007 8:05 pm
Posts: 128
Location: Christchurch

Postby Ian Warren » Fri May 08, 2009 3:53 pm

SeanG wrote:
QUOTE (SeanG @ May 8 2009, 04:41 PM) <{POST_SNAPBACK}>
I wouldn't want to be the pilot of *that* skyhawk, not with your life depending on by dodgy welding! <lol>

Sean , Your to damn modest , .. well then i'd have to be the test pilot rolleyes.gif
Image
User avatar
Ian Warren
NZFF Pro
 
Joined: Fri May 05, 2006 5:23 pm
Posts: 41187
Location: AREA 51

Postby towerguy » Thu Jul 02, 2009 10:02 am

hey Sean
any idea of where I could get my hands on some Rotary ENCODERs in NZ? at a reasonable price?
Dick smith did have them but have run out and not getting any more in and apart from overseas at horrendous freight cost I can't seem to find them in NZ - wondered if you had seen any.
cheers
Craig
CPU- i7 4790K @4.0Gb Cooler- Noctua NH-D15 M/B- Z97 ProGamer P/S- 750W RAM- 16Gb
Graphics- Nvidia GTX970 16Gb Drives- 2x 120Gb SSD Samsung 850EVO, 1x 2Tb HD, 1x DVD-RW
Sound- on M/B Logitec 5.1 surround sound system OS- Win 10 pro , all wrapped in a black Corsair case Display - Panasonic UHD 4k 50" Flatscreen TV.( 3840x2160 Res)
User avatar
towerguy
Sim-holic
 
Topic author
Joined: Mon Aug 07, 2006 4:27 pm
Posts: 886

Postby privatehell » Thu Jul 02, 2009 5:41 pm

any specific type of rotary encoders you want?
privatehell
 

Postby towerguy » Mon Jul 27, 2009 4:21 pm

was looking today at some on the digi-key site - about $9 each - they are the sort that can plug straight on to the opencockpits main board ( I think).

Digi-Key Part Number GH7299-ND
Price Break Unit Price Extended Price
1 8.87000 8.87
25 7.10120 177.53
100 5.32570 532.57
250 4.43864 1,109.66
Quantity Available 21
Manufacturer Grayhill Inc
Manufacturer Part Number 25LB22-G
Description ENCODER MECH 22.5"GY 16POS PC MT
Lead Free Status / RoHS Status Lead free / RoHS compliant
All prices are in NZ dollars.
Last edited by towerguy on Mon Jul 27, 2009 4:23 pm, edited 1 time in total.
CPU- i7 4790K @4.0Gb Cooler- Noctua NH-D15 M/B- Z97 ProGamer P/S- 750W RAM- 16Gb
Graphics- Nvidia GTX970 16Gb Drives- 2x 120Gb SSD Samsung 850EVO, 1x 2Tb HD, 1x DVD-RW
Sound- on M/B Logitec 5.1 surround sound system OS- Win 10 pro , all wrapped in a black Corsair case Display - Panasonic UHD 4k 50" Flatscreen TV.( 3840x2160 Res)
User avatar
towerguy
Sim-holic
 
Topic author
Joined: Mon Aug 07, 2006 4:27 pm
Posts: 886

Postby SeanG » Wed Jul 29, 2009 10:10 pm

towerguy wrote:
QUOTE (towerguy @ Jul 2 2009, 10:02 AM) <{POST_SNAPBACK}>
hey Sean
any idea of where I could get my hands on some Rotary ENCODERs in NZ? at a reasonable price?
Dick smith did have them but have run out and not getting any more in and apart from overseas at horrendous freight cost I can't seem to find them in NZ - wondered if you had seen any.
cheers
Craig


Oops... thought I'd replied....

try www.mandeno.co.nz

They are great guys, with top parts... not the cheapest though...

Sean
Please note I have left this forum, due to an unfortunate incident. I can be contacted on the MilitaryAIWorks forum at http://www.militaryaiworks.com/
SeanG
Member
 
Joined: Thu Oct 18, 2007 8:05 pm
Posts: 128
Location: Christchurch

Postby Nosecone » Tue Sep 08, 2009 6:48 pm

Hi all
Been a while since my last update so I thought it was time I shared some progress.
This is the last and final mockup I will do before I get down to the fabrication side of things.

The plastic conduit I am using is way better than the cardboard mockup, but it’s still hard to get it to keep its shape, especially the centre window strip.

I finally got the measurements I was looking for so I can now get on with the next stage of the project cad design and then laser or water jet cutting.
I am a lot happier with the way the cockpit looks now, and I can see an MD500e model in there somewhere.

Before

after


Rhys
Last edited by Nosecone on Tue Sep 08, 2009 6:53 pm, edited 1 time in total.
User avatar
Nosecone
Forum Addict
 
Joined: Thu Jan 31, 2008 9:22 am
Posts: 234
Location: Upper Hutt

PreviousNext

Return to Technical Issues

Who is online

Users browsing this forum: No registered users and 17 guests