I've started on making scenery of NZOH for FSX. I live on base so have easy access to all the buildings.
I'm starting on one of the hangers (the MSS paintshop).
I'm learning to use GMAX as i go (I've done all the tutorials that come with the program).
The paintshop hanger has an elliptically curved roof.
The only way I can seem to build an elliptical cylinder is to make an elliptical face / spine and and extruding it. My problem is that my elliptical cylinder only has a face on one end of it.
how do i create a solid elliptical cylinder that has a face on both ends that I can then put a slice plane thru.?
I've got all the rest of the hanger contructed
I was out taking photos of all sides of the hanger for the textures this afternoon.
I'm really enjoying the modelling process.
Any Help would be greatfully appreciated
Trev
GMAX modelling problem
18 posts
• Page 1 of 1
![]() by Trev » Sat Jun 13, 2009 7:08 pm
by Trev » Sat Jun 13, 2009 7:08 pm
Thanks That Worked
Yes its going to be for FSX
It's going to take a while tho - just a project to do in muy spare time.
I'm just disatisfied with the scenery at Ohakea, so thought I'd give it a go to make it better.
Yes its going to be for FSX
It's going to take a while tho - just a project to do in muy spare time.
I'm just disatisfied with the scenery at Ohakea, so thought I'd give it a go to make it better.

- Trev
- Member
- Topic author
- Joined: Wed Sep 17, 2008 6:22 pm
- Posts: 101
- Location: Ohakea
![]() by Ian Warren » Sat Jun 13, 2009 7:55 pm
by Ian Warren » Sat Jun 13, 2009 7:55 pm
What a superb winter project Trev  Good luck and looking forward to your build updates
Good luck and looking forward to your build updates 
-

Ian Warren - NZFF Pro
- Joined: Fri May 05, 2006 5:23 pm
- Posts: 41187
- Location: AREA 51
![]() by creator2003 » Sat Jun 13, 2009 9:11 pm
by creator2003 » Sat Jun 13, 2009 9:11 pm
For a curve roof i use the line tool ,make the 2d shape and join the spline then extrude the object ,this will cap each end as long as you join the spline with the line tool , the faces and polys dont matter in fsx and the you can add shadows etc in the maps without any problems will random stuff after youve made the model ...
glad to hear ppls are on to projects,, these next years are going to make a big difference
glad to hear ppls are on to projects,, these next years are going to make a big difference
Last edited by creator2003 on Sat Jun 13, 2009 9:11 pm, edited 1 time in total.
-

creator2003 - NZFF Pro
- Joined: Fri Jun 16, 2006 12:08 am
- Posts: 4633
- Location: Cant U C im LOCO
![]() by Trev » Sun Jun 14, 2009 6:06 pm
by Trev » Sun Jun 14, 2009 6:06 pm
Here the model of the MSS (Maintenance Support Squadron) Paintshop that I've made.
Just starting to skin it
This is the the hanger closest to the entry to base.
For the roof, in the end I used a cylinder and sqaushed it with a non uniform scale then chopped it with a cut plane
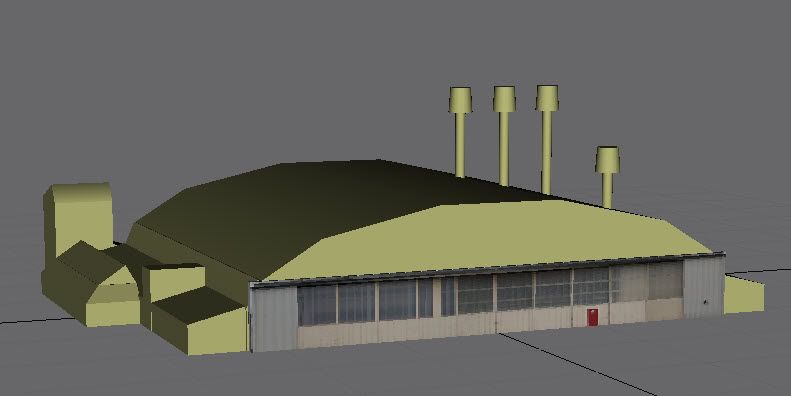 .
.
Trev
Just starting to skin it
This is the the hanger closest to the entry to base.
For the roof, in the end I used a cylinder and sqaushed it with a non uniform scale then chopped it with a cut plane
.Trev
- Trev
- Member
- Topic author
- Joined: Wed Sep 17, 2008 6:22 pm
- Posts: 101
- Location: Ohakea
![]() by Ian Warren » Sun Jun 14, 2009 7:54 pm
by Ian Warren » Sun Jun 14, 2009 7:54 pm
Great start , aerial textures wont be hard to get , just borrow a Huey
-
Ian Warren - NZFF Pro
- Joined: Fri May 05, 2006 5:23 pm
- Posts: 41187
- Location: AREA 51
![]() by Trev » Sun Jun 14, 2009 10:31 pm
by Trev » Sun Jun 14, 2009 10:31 pm
Timmo wrote:QUOTE (Timmo @ Jun 14 2009, 09:54 PM) <{POST_SNAPBACK}>Are you modelling to fit the texture or texturing to fit the model?
Texturing to fit the model Although to get the approximate curve for the roof I modelled to fit the texture (once I'd scaled the texture to the correct size).
I think I prefer the modelling more than the texturing.Last edited by Trev on Sun Jun 14, 2009 10:31 pm, edited 1 time in total.
- Trev
- Member
- Topic author
- Joined: Wed Sep 17, 2008 6:22 pm
- Posts: 101
- Location: Ohakea
![]() by Ian Warren » Sun Jun 14, 2009 11:54 pm
by Ian Warren » Sun Jun 14, 2009 11:54 pm
Trev wrote:QUOTE (Trev @ Jun 14 2009, 11:31 PM) <{POST_SNAPBACK}>I think I prefer the modelling more than the texturing.
I'm sure you will change your mind , the model perfect , but then get some good textures , you'll no when that happens .. hmm maybe its time i start building again .
-
Ian Warren - NZFF Pro
- Joined: Fri May 05, 2006 5:23 pm
- Posts: 41187
- Location: AREA 51

![]() by deaneb » Mon Jun 15, 2009 7:15 pm
by deaneb » Mon Jun 15, 2009 7:15 pm
Trev wrote:QUOTE (Trev @ Jun 14 2009, 10:31 PM) <{POST_SNAPBACK}>Texturing to fit the model Although to get the approximate curve for the roof I modelled to fit the texture (once I'd scaled the texture to the correct size).
I think I prefer the modelling more than the texturing.
Ah the joys of modelling. Most of the time, you will find yourself guestimating building sizes so sometimes it is building models to fit textures. To be accurate, it would be the opposite of course. One hint is you can get a good idea of the rough dimensions buy using google earth. When I did all my models I couldn't be bothered trying to go down to Works Flight to dig through plans.
I'm glad somebody is going for Ohakea again. Are you planning on doing photo real ground textures as well? this would make a great package.
Here are a couple of tips I always adhere to when creating buildings in particular in order to maximise framerates:
- Let the textures do the work - the model defines the shape, but the texture can add all the detail. Such things as recessed doorways and other features that are less than 1 m deep can be done wih textures, rather than adding extra polys.
- Delete all un needed polys, especially those that are hidden i.e. if you create a building that starts with a six sided box, then has a roof added, the base and top of the box are not needed.
- Keep the detail where its seen the most - i.e. more detail on the flightline side and less on the other side. Thats because most people are going to be taxiing around hangars and tarmac areas, but flying over the rest of the base. You can get away with lower res textures on buildings further away etc, or even the backs of hangars.
Having access to Base is the clincher though. Just don't get pinged on security issues, I was never too keen to try to get permission, for fear of opening a can of worms!
Keep up the updates and sing out if you need any advice. I'm not GMAX savvy as I prefere the much simpler FSDS. But all the same principles.
Lastly, what do you do and where do you work Trev? I retired late last year after 22 years as an Aircraft Tech.
Good stuff Deane

-

deaneb - Senior Member
- Joined: Sat Aug 12, 2006 4:40 pm
- Posts: 1561
- Location: Blenheim
![]() by Timmo » Mon Jun 15, 2009 7:44 pm
by Timmo » Mon Jun 15, 2009 7:44 pm
Yes indeedy- If you can get decent source aerial imagery you have solved a rather large piece of the puzzle.
My method for accurate building dimensions is made a whole lot easier by some of the features of Google Sketchup which interfaces directly with Google Earth
In Sketchup, use the tool to grab a snapshot of the buildings (multiple snapshots can be take in the same project). Digitise the foot prints. Extrude up to some arbitary height. You now need the height- Apply a photo* of one side of the building as a texture. Scale the texture so that it fits the XY dimensions- This now means the that the Z/height is known. You usually need to play a bit to make it all fit.
* Having a quality texture of the building face is key- I try to get one side of the building all in one shot and from a fair way back to minimise vertical distortion. I also remove any lense and slant distortion in photo editing software.
The good thing is, Sketchup has a full version trial avaliable for download which allows export to .3ds into Gmax. I use the free version to do all the work (since the trial is time limited) and then open it in the trial and export it. This gives a good base to work off in Gmax. This is, of course, modelling to the texture as I believe having the textures free of distortion gives better results than making a texture fit a model.
- Timmo
- NZFF Pro
- Joined: Wed Oct 25, 2006 6:28 pm
- Posts: 2056
- Location: Tauranga
![]() by Trev » Mon Jun 15, 2009 9:35 pm
by Trev » Mon Jun 15, 2009 9:35 pm
deaneb wrote:QUOTE (deaneb @ Jun 15 2009, 07:15 PM) <{POST_SNAPBACK}>Lastly, what do you do and where do you work Trev? I retired late last year after 22 years as an Aircraft Tech.
Good stuff Deane
Hi Deane
You were in the SAP project team werent you?
I'm the Sgt Safety and Surface Tech at 3 Sqn. I'm up to 21 and a 1/2 years so far (R4/87).
I'm not sure how to create the photo real ground textures.
I've used FSX Planner to modify the NZOH AFCAD to correct the aprons and taxi ways.
TrevLast edited by Trev on Mon Jun 15, 2009 10:24 pm, edited 1 time in total.
- Trev
- Member
- Topic author
- Joined: Wed Sep 17, 2008 6:22 pm
- Posts: 101
- Location: Ohakea
![]() by deaneb » Mon Jun 15, 2009 10:32 pm
by deaneb » Mon Jun 15, 2009 10:32 pm
Trev wrote:QUOTE (Trev @ Jun 15 2009, 09:35 PM) <{POST_SNAPBACK}>Hi Deane
I'm the Sgt Safety and Surface Tech at 3 Sqn. I'm up to 21 and a 1/2 years (R4/87).
Trev
I was R1/86 - I'm sure I'd probably know who you are, but just not making the connection. I only spent 7 months at Ohakea (1988) the rest has been Whenuapai and Woodbourne. For my final years I was on the JEMS project and then SAP Master Data Controller at Woody. But you don't do over 20 years without knowing most of the Techies !!Timmo wrote:QUOTE (Timmo @ Jun 15 2009, 07:44 PM) <{POST_SNAPBACK}>Yes indeedy- If you can get decent source aerial imagery you have solved a rather large piece of the puzzle.
My method for accurate building dimensions is made a whole lot easier by some of the features of Google Sketchup which interfaces directly with Google Earth
In Sketchup, use the tool to grab a snapshot of the buildings (multiple snapshots can be take in the same project). Digitise the foot prints. Extrude up to some arbitary height. You now need the height- Apply a photo* of one side of the building as a texture. Scale the texture so that it fits the XY dimensions- This now means the that the Z/height is known. You usually need to play a bit to make it all fit.
* Having a quality texture of the building face is key- I try to get one side of the building all in one shot and from a fair way back to minimise vertical distortion. I also remove any lense and slant distortion in photo editing software.
The good thing is, Sketchup has a full version trial avaliable for download which allows export to .3ds into Gmax. I use the free version to do all the work (since the trial is time limited) and then open it in the trial and export it. This gives a good base to work off in Gmax. This is, of course, modelling to the texture as I believe having the textures free of distortion gives better results than making a texture fit a model.
Nice - I like your methology. One day I might leap to GMAX, but every time I try that path I give up in disgust. Of all the 3d modelling tools I have ever used, its the worst.
deaneb- Senior Member
- Joined: Sat Aug 12, 2006 4:40 pm
- Posts: 1561
- Location: Blenheim
![]() by Trev » Mon Jun 15, 2009 10:47 pm
by Trev » Mon Jun 15, 2009 10:47 pm
Timmo wrote:QUOTE (Timmo @ Jun 15 2009, 07:44 PM) <{POST_SNAPBACK}>Yes indeedy- If you can get decent source aerial imagery you have solved a rather large piece of the puzzle.
My method for accurate building dimensions is made a whole lot easier by some of the features of Google Sketchup which interfaces directly with Google Earth
In Sketchup, use the tool to grab a snapshot of the buildings (multiple snapshots can be take in the same project). Digitise the foot prints. Extrude up to some arbitary height. You now need the height- Apply a photo* of one side of the building as a texture. Scale the texture so that it fits the XY dimensions- This now means the that the Z/height is known. You usually need to play a bit to make it all fit.
* Having a quality texture of the building face is key- I try to get one side of the building all in one shot and from a fair way back to minimise vertical distortion. I also remove any lense and slant distortion in photo editing software.
The good thing is, Sketchup has a full version trial avaliable for download which allows export to .3ds into Gmax. I use the free version to do all the work (since the trial is time limited) and then open it in the trial and export it. This gives a good base to work off in Gmax. This is, of course, modelling to the texture as I believe having the textures free of distortion gives better results than making a texture fit a model.
Timmo,
Thanks for telling me about Google Sketchup. Just had a wee play with it. Will be a nice accurate way of exporting accurate building shapes from google earth.
Trev
- Trev
- Member
- Topic author
- Joined: Wed Sep 17, 2008 6:22 pm
- Posts: 101
- Location: Ohakea
![]() by NZ255 » Mon Jun 15, 2009 11:08 pm
by NZ255 » Mon Jun 15, 2009 11:08 pm
Wouldn't be that hard would it? If they have RNZAF A/C for FSX on their site?
They would probably roll out the red carpet with permission and aerial images if you said it were a marketing tool right? That is what the A/C were seen as to them, weren't they?
They would probably roll out the red carpet with permission and aerial images if you said it were a marketing tool right?
That is what the A/C were seen as to them, weren't they?Nick
-

NZ255 - NZFF Pro
- Joined: Wed Jun 20, 2007 12:57 pm
- Posts: 2475
18 posts
• Page 1 of 1
Who is online
Users browsing this forum: No registered users and 10 guests