This thread will act as the main 'go to' support thread for the new Prepar3d v4 installers for Dunedin and Nelson.
First up, here's an overview of what is included, and how it works.
These are served as multi-installers, like before, but adding Prepar3d v4 support, and removing Prepar3d v2. I removed v2 as I've long-since deleted my v2 installation, so can no longer test it. However if you still use v2, you can continue to use the previous multi-installer. If you no longer have the previous multi-installer for v2, let me know and I'll send a temporary link.
My install system for Prepar3d v3 has been mostly made obsolete by my commitment to the recommended addon methods for v4. So for v4, gone is the godzone.xml method of tracking the install location. To replace it, there's a similar scheme, but it does allow different scenery products to be installed in different locations. However, this does result in some weird features...
When you first install Real NZ Dunedin or Real NZ Nelson, you will get the opportunity to choose the install location, as with v3. This location will continue to be used for future installs or updated for that one scenery only. So you can install Dunedin and Nelson in very different locations if you wish. Not that I'd recommend that, and you really need to give some thought where you would like to install Godzone/Real NZ scenery, given that it might add up to 10s of gigabytes. In v3, this was taken care of for you, as it didn't allow you to choose for each product, just the first one installed.
Subsequent installs or updates, without uninstalling first, will automatically select the existing location, so if you want to reinstall to a different location, you need to uninstall it first.
If a Godzone/Real NZ installer finds an existing scenery install for any supported scenery, more specifically the Godzone shared support files (global textures and elevation stubs), it will recommend that location in the 'browse' box, but you can overwrite this if you wish. Best not to, though, if you want a consistent installation location.
A quick note about the 'browse' box -- you must use the 'browse' button to locate a folder, if you do not wish to use the recommended location! Just typing or pasting a location into the box will not work! This is a limitation of the installer program I use.
What's new in the Prepar3d v4 scenery
Not a lot, as this is just a minor update to the actual scenery. The ground polys at Nelson have been updated to native Prepar3d for both v3 and v4. This adds specular shine, and I have tidied up the Prepar3d versions of the ground polys a bit, which had always bugged me.
Nelson now uses SODE for the windsocks and flags, for Prepar3d only, to overcome the use of default windsocks when the FSX socks stopped working in Prepar3d.
Both Dunedin and Nelson have a few dynamic lights on the tarmac. Not too many, as these are known to affect performance at the moment, something which Lockheed Martin will hopefully fix soon. But dynamic lights are too good to pass up:) If you find that these affect performance too much, try reducing your AA settings in the simulator.
The new 'add-on.xml' method of installing Prepar3d v4 scenery
This may be the first time some of you have been confronted with this new system, so you may wish to read up on it a little to understand how it works, the benefits and the ramifications. I can really only talk about how this works for my scenery, but some developers may do things their own way, so this is not an overview of add-on.xml in general, it's just my take on it.
Up until recently each Godzone/Real NZ scenery has been installed in its own folder within the main simulator install location, or more recently in its own folder within a 'Godzone' folder within the main simulator install location. Phew.
With Prepar3d, I introduced the choice of installing this 'Godzone' folder, and all subsequent scenery, in the location of your choice. This still works that way for Prepar3d v3.
With v4, you should never install addon scenery within the main simulator folder. This applies to all addon files, such as 'global' textures which used to go in the main Texture folder, and elevation stubs which used to go in Scenery\World\Scenery. To control how the simulator finds all these different components, including the actual scenery, effects etc, it uses an 'add-on.xml' file which is found in Documents\Prepar3D v4 Add-ons, followed by the name of the add-on. So for Dunedin or Nelson, and few add-on.xml files are added here:
'Godzone' -- adds the global textures and elevation stubs for all Godzone/Real NZ scenery;
'RealNZdunedin' and 'RealNZnelson' -- adds the actual scenery and textures;
'VLC_libraries' -- adds the effects used by the libraries.
Note that the VLC Libraries do not use the add-on.xml method, for two reasons -- first, you need to set the FTX Insertion Point if you use Orbx NZ scenery, and this needs an 'anchor' point to choose where to locate the Orbx scenery to set the priority. FTX Central reads the scenery.cfg file to display the choices, but using the add-on.xml method bypasses the scenery.cfg file. Adding the VLC Libraries to the scenery library via the scenery.cfg gives an entry which can act as an anchor point.
Plus, the Autogen Configuration Merger Tool, which Dunedin uses, looks at entries in the scenery.cfg to find installed scenery which may need to be merged, so these are now controlled by the VLC Libraries, so ACMT can find them. I know it sounds complicated, and it is, but this is simplest way to organise it from a user perspective.
So, long story short:), don't move or touch the add-on.xml files in your Documents system, these are just tiny little files which don't eat up your limited SSD space, and must be left there so that Prepar3d can find them.
When you first run Prepar3d after installing an addon, it will ask if you wish to activate the addon. This isn't a trick question, just choose 'yes'. You can control addon activations via the Options menu within the simulator.
And finally, you will end up with some files which look like they should be in your Prepar3d folder system, but don't go moving them there -- the idea is that if you ever need to reinstall or update Prepar3d, you shouldn't need to worry about reinstalling Real NZ scenery, it will automatically be picked up and used by the updated simulator. Excluding the VLC Libraries, of course as these use the old ways...
However as Orbx still installs NZ scenery into the actual Prepar3d folder system, my installers may tweak some of these, there's really no way around that until Orbx start to use the recommended methods.
What can't I uninstall Dunedin or Nelson from Prepar3d v4?
Version 1.4 of Nelson and version 1.1 of Dunedin both went out with faulty uninstall scripts. These have now been replaced with Nelson 1.41 and Dunedin 1.11. There's one other change in these updates, which made the folder chooser more robust, and fixed an issue with the Godzone support files if you installed both Dunedin and Nelson, but to different locations. So if you have downloaded these faulty installers, you should down download the updated versions, and reinstall. Don't run the uninstaller, the installers will work just fine overwriting the scenery, and will fix the uninstall issues.
Where can I download the updates?
The normal method I use to distribute my scenery just has one current version online for each scenery, with the same filename, so that once it is updated on my site, you can download the new version depending on how you purchased the original scenery.
So for the Godzone Store, just go to 'My Account' and locate the downloads there.
For the old Godzone, Store, go to your account downloads there, but first you may need to request that your downloads are reactivated -- just let me have the order number via email.
For Subscribers, Nelson can be downloaded from the 'quick downloads' page.
Real NZ Dunedin and Nelson Prepar3d v4 support thread
8 posts
• Page 1 of 1
Real NZ Dunedin and Nelson Prepar3d v4 support thread
![]() by toprob » Sat Sep 16, 2017 4:38 pm
by toprob » Sat Sep 16, 2017 4:38 pm
-
toprob - NZFF Pro
- Topic author
- Joined: Sat Apr 29, 2006 4:56 pm
- Posts: 6482
- Location: Upper Hutt
Re: Real NZ Dunedin and Nelson Prepar3d v4 support thread
![]() by MurrayH » Fri Nov 23, 2018 6:21 am
by MurrayH » Fri Nov 23, 2018 6:21 am
Hi Robin
I currently experiencing missing textures on autogen houses. They are all black. The roofs are OK, just the walls are missing.
It only happens in Dunedin and Nelson scenery. I have tried reinstalling both sceneries again and VLC as well, but the problem still persists.
Could please tell me where these autogen textures are stored and how to fix this.
I have Prepar3d V4 and all ORBX New Zealand airports.
Thanks,
Murray
- MurrayH
- Member
- Joined: Tue Jan 23, 2007 8:54 am
- Posts: 50
Re: Real NZ Dunedin and Nelson Prepar3d v4 support thread
![]() by toprob » Fri Nov 23, 2018 8:43 am
by toprob » Fri Nov 23, 2018 8:43 am
The custom building textures are kept in the Godzone\texture\Global folder, wherever you chose to place the Godzone folder. If you installed via the installer, then they'll be there. They are activated by the Godzone\add-on.xml file, which is separate from the Dunedin or Nelson add-on.xml. Make sure that the 'Godzone' addon is activated, I have know cases where users have turned in off at some stage, and forgotten to turn it back on.
-
toprob - NZFF Pro
- Topic author
- Joined: Sat Apr 29, 2006 4:56 pm
- Posts: 6482
- Location: Upper Hutt
Re: Real NZ Dunedin and Nelson Prepar3d v4 support thread
![]() by MurrayH » Fri Nov 23, 2018 9:32 am
by MurrayH » Fri Nov 23, 2018 9:32 am
Thanks Robin
I found the add-ons.cfg file was the issue. It had this entry...
[Package.0]
PATH=C:\Users\Murray\Documents\Prepar3D v4 Add-ons\Godzone
ACTIVE=false
REQUIRED=false
I'm not sure why it got changed to FALSE or why the add-ons are in my Documents folder.
Many thanks for pointing me in the right direction.
Cheers,
Murray
- MurrayH
- Member
- Joined: Tue Jan 23, 2007 8:54 am
- Posts: 50
Re: Real NZ Dunedin and Nelson Prepar3d v4 support thread
![]() by toprob » Fri Nov 23, 2018 10:08 am
by toprob » Fri Nov 23, 2018 10:08 am
Ok, glad you could sort it.
The add-on.xml files are always in your Documents folder, that's the only place where Prepar3d expects to find 'em. I guess they are documents, as you can read them, they are in fact easier to read than, say, poetry....
Whenever you add an addon this way, the sim will ask you initially if you wish to activate it. You can also control this via the Scenario screen, there's an 'add-on' button, or via the Options menu. You shouldn't need to touch the add-ons.cfg file.
The Add-on.xml system is great, once you get the hang of it. Activation of any addon is as simple as dropping an add-on.xml file into Documents\Prepar3D v4 Add-ons\name of addon, so no manual activation or cfg tweaking required. Whenever Prepar3d starts, it will check the documents folder for new xml files, if it finds them it'll add them to add-on.cfg, and ask if you want to activate it.
The great thing about this is that if you need to reinstall Prepar3d, the add-on.xml files plus any addons which you installed outside Prepar3d -- like all of them should be -- are untouched. When you run the updated or re-installed Prepar3d, it'll just ask if you want to re-activate the addons, choose yes and they are done, no reinstall of addons required.
In the old days (FSX), the custom autogen textures used to go in the default Texture folder, but putting anything inside the sim folders is not a good idea. The Godzone add-on.xml file also controls the placement of the elevation tabs, which used to go in Scenery\World\Scenery. It used to be a real problem when people would have to reinstall their sim, and then had trouble getting their Godzone scenery to work. Now it's all taken care of!
Since releasing Dunedin, it has come to light that you shouldn't have too many add-on.xml fles, so in the future I'll be combining some Godzone addons into one xml file. This will happen with the Subscription once I get around to it. I just need a robust system to check/add/remove entries without stuffing anything up. I am thinking of having a tool which does all this, including checking that all entries actually have scenery folders, and lets you turn individual entries on/off. However this is 'coding', so it may never happen.
-
toprob - NZFF Pro
- Topic author
- Joined: Sat Apr 29, 2006 4:56 pm
- Posts: 6482
- Location: Upper Hutt
Re: Real NZ Dunedin and Nelson Prepar3d v4 support thread
![]() by airnz515 » Fri Nov 30, 2018 9:09 am
by airnz515 » Fri Nov 30, 2018 9:09 am
Hi,
I bought Real NZ Dunedin yesterday and so far I am enjoying it. However, when using the Aerosoft Airbus A320 Professional, the jetbridge at Gate 1 seems too low to correctly line up with the door, and the nose wheel ground markings seem too far forward to line the door up correctly with the jetbridge. Is there something I should be doing to correct this? I have attached photos for reference.
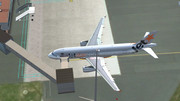
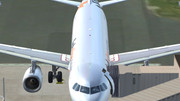
I bought Real NZ Dunedin yesterday and so far I am enjoying it. However, when using the Aerosoft Airbus A320 Professional, the jetbridge at Gate 1 seems too low to correctly line up with the door, and the nose wheel ground markings seem too far forward to line the door up correctly with the jetbridge. Is there something I should be doing to correct this? I have attached photos for reference.
- airnz515
- Member
- Joined: Thu Oct 01, 2015 10:20 am
- Posts: 41
Re: Real NZ Dunedin and Nelson Prepar3d v4 support thread
![]() by toprob » Fri Nov 30, 2018 9:32 am
by toprob » Fri Nov 30, 2018 9:32 am
Yes, I know that a recent SODE update changed the actions of the jetways just enough to make them misbehave, and I do have it on the list to fix. However the main reason is that this was my first 'fixed' jetway I ever built, and the second jetway of any type -- the first was gate 3, which I'll tweak as well:)
I've learnt a lot about SODE jetways working on NZCH, so after that's released, I'll rework NZDN.
I've learnt a lot about SODE jetways working on NZCH, so after that's released, I'll rework NZDN.
-
toprob - NZFF Pro
- Topic author
- Joined: Sat Apr 29, 2006 4:56 pm
- Posts: 6482
- Location: Upper Hutt
Re: Real NZ Dunedin and Nelson Prepar3d v4 support thread
![]() by cowpatz » Fri Nov 30, 2018 10:43 am
by cowpatz » Fri Nov 30, 2018 10:43 am
Just no rest for scenery designers is there?
-

cowpatz - NZFF Pro
- Joined: Wed Mar 07, 2007 3:28 pm
- Posts: 3373
8 posts
• Page 1 of 1
Return to Godzone 'Real New Zealand' Scenery Support
Who is online
Users browsing this forum: No registered users and 3 guests